Next, you will learn how to build an EDM that captures the bulk of the AutoLot database, including your GetPetName stored procedure. I strongly suggest that you make a copy of the AutoLotDAL (Version 3) project you created in Chapter 22 and rename this copy to AutoLotDAL (Version 4).
Open the latest version of the AutoLotDAL project in Visual Studio 2010 and insert a new ADO.NET Entity Data Model project item named AutoLotDAL_EF.edmx. On step three of the wizard, you should select the Inventory, Orders, and Customers tables (there’s no need to nab the CreditRisks table at this time), as well as the custom stored procedure (see Figure 23-17).
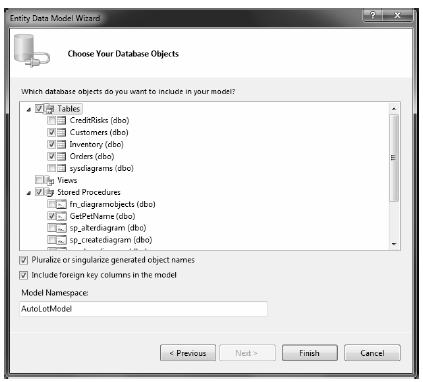
Figure 23-17 The *.edmx file for a majority of the AutoLot database
In contrast to the first EDM example, this time you don’t bother renaming your entity class names or their properties.
Here’s one aspect of the EDM Wizard that is quite odd: even when you check off the name of a stored procedure to include in your conceptual model, your work is not done. At this point all you have done is make the IDE aware of the physical stored procedure; to make it materialize in code, you need to import the function into the conceptual layer. Open the Model browser (using the View > Other Windows > Entity Data Model Browser menu) and notice that you can see GetPetName in the physical database (located under AutoLotModel.Store); however, the Function Imports folder (highlighted in Figure 23-18) is currently empty.
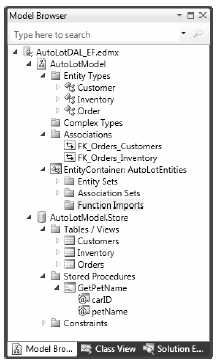
Figure 23-18 Stored procedures must be imported before you can call them!
You can begin mapping this to your conceptual layer by right-clicking on the Function Imports folder and selecting the Add Function Import... menu option (see Figure 23-19).

Figure 23-19 Choosing to import a stored procedure into your conceptual model
In the resulting dialog box, you want to pick the name of the physical stored procedure (from the Stored Procedure Name dropdown box), and then supply a name of the method to map to in your conceptual model. In this case, the names will map directly. Now recall that your stored procedure does not literally return a set of records; however, it does return an output parameter. Thus, you need to make sure that you check the None radio button (see Figure 23-20).
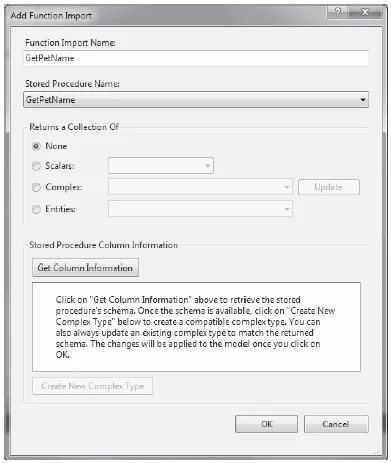
Figure 23-20 Mapping the physical stored procedure to the conceptual model
If you look at the EDM designer now, you will see each table is accounted for, including new entries in the Navigation Properties section of a given entity class (see Figure 23-21).
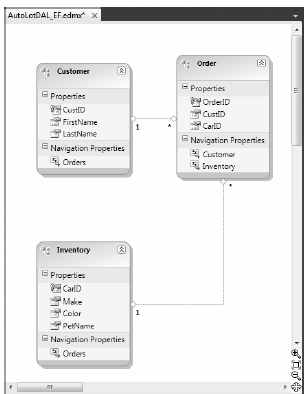
Figure 23-21 Navigation properties
As the name suggests, navigation properties allow you to capture JOIN operations in the Entity Framework programming model (without the need to author complex SQL statements). To account for these foreign key relationships, each entity in the *.edmx file now contains some new XML data that shows how entities are connected through key data. Feel free to open the *.edmx file using the XML editor if you wish to see the markup directly; however, you can see this same information in the Model Browser window, under the Associations folder (see Figure 23-22).
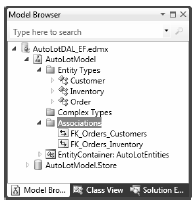
Figure 23-22 Viewing your entity relationships
If you wish, change the version number of this new library to 4.0.0.0 (using the Assembly Information button within Applications tab of Properties window). Now compile your modified AutoLot.dll assembly before moving to the first client application.
Next, you will learn how to use these navigation properties within the context of LINQ to Entity queries (you could also use them with Entity SQL; however, this book doesn’t delve into that aspect of this topic. Before you bind your data to a Windows Forms GUI, you make one final Console Application named AutoLotEDMClient. Once you create the project, set a reference to System.Data.Entity.dll and the latest and greatest version of AutoLotDAL.dll.
Next, insert the App.config file from your AutoLotDAL project (using the Project > Add Existing Item menu option) and import the AutoLotDAL namespace. Recall that the App.Config file generated by the EDM tools defines the correct connection string required by the Entity Framework.
Next, you will update the physical Orders table with a few new records. Specifically, you want to ensure that a single customer has multiple orders. Using the Visual Studio 2010 Server Explorer, update the Orders table with one or two new records to ensure that a single customer has two or more orders. For example, in Figure 23-23, customer #4 has two pending orders, for cars #1992 and #83.
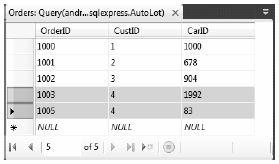
Figure 23-23 A single customer with multiple orders
Now update your Program with a new helper method (called from Main()). This method uses the navigation properties to select each Inventory object on order for a given customer:
private static void PrintCustomerOrders(string custID)
{
    int id = int.Parse(custID);

    using (AutoLotEntities context = new AutoLotEntities())
    {
        var carsOnOrder = from o in context.Orders
            where o.CustID == id select o.Inventory;

        Console.WriteLine("\nCustomer has {0} orders pending:", carsOnOrder.Count());
        foreach (var item in carsOnOrder)
        {
            Console.WriteLine("-> {0} {1} named {2}.",
                item.Color, item.Make, item.PetName);
        }
    }
}
When you run your application, you see something similar to the following output (notice that you specify a customer ID of four when you call PrintCustomerOrders() from Main()):
***** Navigation Properties *****
Please enter customer ID: 4

Customer has 2 orders pending:
-> Pink Saab named Pinky.
-> Rust Ford named Rusty.
Here, you find a single Customer entity in the context, which has the specified CustID value. Once you find the given customer, you can navigate to the Inventory table to select each car on order. The return value of your LINQ query is an enumeration of Inventory objects, which you print out using a standard foreach loop.
In the AutoLotDAL EMD, you now have the information you need to invoke the GetPetName stored procedure. You can do this using either of two approaches:
private static void CallStoredProc()
{
    using (AutoLotEntities context = new AutoLotEntities())
    {
        ObjectParameter input = new ObjectParameter("carID", 83);
        ObjectParameter output = new ObjectParameter("petName", typeof(string));

        // Call ExecuteFunction off the context....
        context.ExecuteFunction("GetPetName", input, output);

        // ....or use the strongly typed method on the context.
        context.GetPetName(83, output);

        Console.WriteLine("Car #83 is named {0}", output.Value);
    }
}
The first approach is to call the ExecuteFunction() method of your object context. In this case, the stored procedure is identified by a string name, and each parameter is represented by an object of type ObjectParameter, which is in the System.Data.Objects namespace (don’t forget to import this into your C# code file!).
The second approach is to use the strongly typed name in your object context. This approach proves a tad simpler because you can send input parameters (such as the car ID) as typed data, rather than as an ObjectParameter object.
Source Code You can find the AutoLotEDMClient example under the Chapter 23 subdirectory.